Archive | Recess time ideas RSS feed for this section

Gluten-free Recipe: Pine+Apple Cake with Maple Icing

20 Oct

pine+apple cake 2

I can’t think of anything meaningful to say this week, so instead here are three random and unrelated facts about me:

  1. My 5 year-old son and I are making a pompom. That is, I’m making the pom pom while he gets the wool nicely tangled and strewn up everywhere. It’s for a kindy project – all the kindy kids’ pompoms are going to be hung from a tree. It should look amazing. They’re so easy to make, thank God, as my craft skills would barely cope with anything else. Previous parents were asked to knit squares for a blanket. Jeez, that would have been my worst nightmare. My poor Mum tried to teach me to knit but I was just so hopeless at it. She blamed it on my severe left-handedness. I blamed it on lack of talent. To this day, I think she considers it a parental failing that I can’t knit. Time to let that one go, Mum!
  2. Thanks to the recommendation of a good friend, my Husband and I are currently watching Studio 60 on the Sunset Strip, created and written by Aaron Sorkin. Damn, it’s good. I love Sorkin’s work. I really loved The Newsroom and earlier this year I did manage to work my way through one season of The West Wing – still fab after all this time. I don’t think I’ll rest until I’ve watched everything Sorkin has ever done. He’s a genius.
  3. We are in the middle of spring here in Australia and that means that everyone’s having garage sales and all the schools are having fundraising fairs or fetes. That means loads of second-hand goods. That means plenty of opportunities to buy props for food photos, as well as kids’ clothes and toys. I love a bargain, so this makes me happy. I love a bargain so much that I’m thinking about blogging my food prop purchases. What do you think? If you love a bargain as much as me, check out the lovely blog The Second Hand City, especially if you live in Melbourne. It’s wonderful for glimpses of how its author, Leanne, finds and uses her recycled treasures.

That’s all. But I should just say that this recipe is awesome. And I think its name is awesome, too (pineapple plus apple equals pine+apple. Geddit?). So you can either choose to bask in its awesomeness by cooking it, or not.

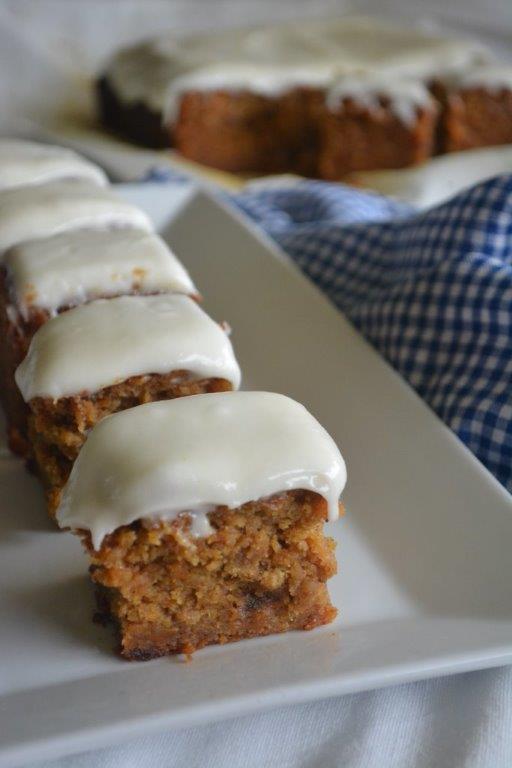
Oh, and yes, occasionally I allow my kids to have iced cakes at school. Gotta be healthy most of the time, but gotta live as well. And honestly, you are really going to want to try the maple icing.

Enjoy!

Method

Cake

2 eggs

150 g brown sugar

50 g tapioca flour

70 g sorghum flour

60 g brown rice flour

30 g baking powder

5 g psyllium husks

200 g (approximately 2)  peeled, cored and grated apple

120 g (approximately 3 rings) drained tinned pineapple

125 ml oil

Icing

45 g butter, melted

1 ½ tbs pure maple syrup

100 g gluten-free icing mixture

Method

Preheat oven to 180° Celsius (conventional oven) or 160° Celsius (fan-forced oven). Grease a 24 cm fluted ring cake tin.

Beat eggs in the large bowl of an electric mixer on medium speed for 5 minutes. Add sugar and beat for a further 2 minutes.

Sift in tapioca flour, sorghum flour, brown rice flour, baking powder and psyllium husks. Add apple.

Chop the pineapple into 1 cm chunks and add to the mixture. Add oil.

Mix until well combined.

Pour into tin and make sure mixture is evenly disbursed. Bake for 35-40 minutes or until a skewer, when inserted, comes out clean.

Allow to cool in tin.

When cake is completely cooled, turn out onto a plate.

To make the icing, put the butter in a small bowl and cover with a plate or plastic film. Microwave on high for 30 seconds or until butter is melted.

Sift icing mixture into a medium sized bowl and add maple syrup. Add butter and stir to combine. Spread evenly over cake and stand for a few minutes to set.

Makes 8 to 10 slices.


GFL’s Top 10 Lunchbox Snack Recipes

30 Sep

It’s been a while between blog posts for me. I’ve had a disrupted couple of weeks as the school term has finished and kids have started holidays and I’ve also had a few health issues which have meant I’ve had to slow down a bit. There’s a couple of recipes in the works, but I’ve taken a bit of time out to throw my feet up and watch some old episodes of ER and the West Wing.

Damn, after all these years they still make superb viewing!

Anyway, it occurred to me that many of you may not want to spend time sifting through my blog to find the perfect recipes for you or your kids, so here’s a little summary of the recipes that I think are my 10 best for lunchbox snacks (or recess time, as we in Australia tend to call it).

The most popular recipes seem to contain chocolate. Fancy that! But the good news is that most of them are low in sugar, too. Best of both worlds!

And without further ado …

Continue reading

Gluten-free Recipe: Chocolate and Ginger Brownies

14 Sep

ChocGinger Brownies

Honestly, I didn’t set out to make brownies. I was actually thinking of this recipe as a biscuit-y slice. But when I’d mixed it up for the first time, I saw the brownie potential.

I’ve never really aspired to develop my own brownie recipe – there’s so many out there. Who needs another one? That being said, I have once before delved into the glorious world of chocolately fudge. I created a gluten-free clean and mean brownie, with no added sugar and whole ingredients. It’s in my eCookbook, which you can purchase here.

I really love ginger. I mean, I LOVE it. It tastes brilliant fresh, or dried and ground, and it’s so, so good for you. For more information about the nutritional properties of ginger, click here. Yep, because I’m a ginger loving redhead, you could call me a ginger nut!

I also love the combination of ginger and chocolate and it makes a pleasantly surprising twist to the universally loved brownie.

This recipe has added sugar, but it’s fairly restrained, making it great for lunchboxes. It’s got prunes in it which are great for a hefty dose of fibre and … er … to keep things regular. I worked on it for a while so that it would be fudgy and gooey and generally pretty delectable.

Kids don’t like the ginger? No problems. Just leave it out. Want a more adventurous combination? Try a hint of chilli or some sea salt sprinkled over the top. Want to up the sugar content for a special treat? Just throw in a handful of chocolate buttons.

But however you like your brownies, you’ve just got to try this recipe!

Enjoy!

[su_button url=”http://www.glutenfreelunchboxes.com/shop/” target=”blank” style=”flat” background=”#e659ae” color=”#ffffff” size=”7″ wide=”yes” center=”yes” radius=”round”]Gluten-free Lunchboxes eCookbook – Shop Now![/su_button]

Ingredients

300 g pitted prunes

100 g tapioca flour

80 g sorghum flour

80 g brown rice flour

50 g gluten-free cocoa powder

5 g psyllium husk

150 g brown sugar

2 eggs, lightly beaten

120 g butter, melted

60 ml milk

35 g crystallised ginger, finely diced

Method

Preheat oven to 180° Celsius (conventional oven) or 160° Celsius (fan-forced oven). Grease and line a square 21 cm cake tin.

Ensure that any remaining seeds are removed from the prunes. Put prunes in a glass or ceramic bowl and cover with water. Cover the bowl with a plate or plastic wrap and microwave on high for 4 minutes. Drain thoroughly and purée. Set aside to cool a little.

In the meantime, into a large bowl sift the tapioca flour, sorghum flour, brown rice flour, cocoa and psyllium husk. Add the sugar, eggs, butter, milk, ginger and prunes. Mix until combined.

Pour mixture into tin and spread evenly.

Bake for 25-30 minutes or until a crust forms on the outside and mixture is just set but moist and fudgy on the inside.

Allow to cool in tin.

When completely cool, cut into 4 cm squares.

Makes approximately 25 squares.

Gluten-free Recipe: Moroccan Carrot Cake

12 Aug

moroccan carrot cake

I’ve been more than a little obsessed with gluten-free carrot cake ever GF and Me, one of my favourite food blogs, posted their recipe for Spiced Carrot Cake. It’s gluten-free and dairy free, but it was the picture of the cake that really intrigued me. Click through to see how beatifully moist that cake is. OMG. And what’s more, it’s got pineapple in it and coconut flour. A taste sensation!

Well, I just had to make it. And it was amazing so I blogged the result.

Since discovering that recipe, I’ve not had any interest in developing a carrot cake recipe until recently, when I started to think about Moroccan flavours and how well they would work in a carrot cake.

I tinkered with this recipe for a while and was really pleased with the results. The carrots, dates, honey and spices really work beautifully together and they make the texture moist and strong.  A lovely recess-time treat.

My recent recipes look a food tour of the world – Vietnamese cold rolls, Italian style Cornbread and now Morocco. I might keep going to see what other cultural delights await.

Enjoy!

Ingredients

Cake

2 eggs

250 g dates

50 g tapioca flour

70 g sorghum flour

60 g brown rice flour

30 g baking powder

1 tsp ground cinnamon

5 g psyllium husks

110 g brown sugar

320 g peeled and trimmed carrots, grated

1 ½ tbs honey

125 ml oil

125 ml milk

Icing

70 g ricotta cheese

1 tsp honey

250 g gluten-free icing mixture

2 tsp milk

Method

Preheat oven to 180° Celsius (conventional oven) or 160° Celsius (fan-forced oven). Grease and line a square 21 cm cake tin.

Put eggs in large bowl of an electric mixer and beat on medium speed for 5 minutes.

In the meantime, put dates into a microwave safe bowl and cover with cold water. Cover the bowl with a plate or plastic wrap. Microwave on high for 3 minutes. Drain thoroughly and allow to cool a little. Purée until smooth.

Into the bowl with the eggs, sift in the tapioca flour, sorghum flour, brown rice flour, baking powder, cinnamon and psyllium. Add the sugar, carrots, dates, 1 ½ tbs honey, oil and milk. Mix until well-combined.

Pour mixture into cake tin. Bake for 55 mintutes or until a skewer, when inserted, comes out clean. Allow to cool in tin.

To make the icing, put ricotta cheese and honey into bowl of an electric mixer and beat on high for 2 minutes. Scrape the sides of the bowl to make sure the honey is evenly dispersed. Add the icing mixture and milk and beat until well-combined. Once cake is completely cooled, remove from tin and spread icing evenly over the cake.

Cut into 5 cm x 3 cm slices to serve.

Makes approximately 20 slices.


Gluten-free Recipe: Basic Banana Muffins

21 Jul

Basic banana muffins

This is a bit of a hit ‘n’ run post as there’s a few things in the works, mainly the inaugural Gluten-Free Expo in Adelaide this weekend. I’m doing two cooking demonstrations and guest speaking so there’s a bit to organise, but I’m excited to have this opportunity and I’ll be blogging about it next week.

Thankfully, the kids are back at school after 2 weeks of holidays – phew! We all needed the break, but the July holidays are always the most difficult – deep winter means there’s not much opportunity to get outside. We spent a few days in Port Elliot on South Australia’s beautiful Fleurieu Peninsula. It was great to get away, but the cold winds coming off the ocean were something else! It was a good excuse to keep the heaters on.

This recipe is a variation of my Banana Choc Muffin recipe, which my kids absolutely love. It’s great to have a basic banana muffin recipe, though. You can muck around with the flavours by adding coconut, apricot, berries, or basically whatever tickles your fancy.

I love cooking with banana – it’s a bit of a wonder ingredient in gluten-free baking. Not only does it add loads of moisture to your baked goods, it also gives cakes and muffins a really strong and springy texture. If you’re tired of dry and crumbly cakes and muffins, add some banana and marvel at the improvement!

I don’t know why this is so, but this post by Gluten-free Girl suggests that bananas (and green ones in particular) are high in starch. Given that starch is so important in gluten-free baking, maybe that’s why.

Gluten-free Girl’s post has fuelled my interest in banana flour and its possibilities and I can’t wait to get my hands on some. Stay tuned for some recipes!

I cook big batches of these muffins, as they freeze and defrost really well. My kids and their friends love them and yesterday I sent them to school and kindy in the lunchboxes for a recess-time refuel. No leftovers = win for Mum!

Enjoy!

Ingredients

2 eggs

50 g tapioca flour

70 g sorghum flour

60 g brown rice flour

20 g baking powder

1 tsp ground cinnamon

5 g psyllium husk

110 g brown sugar

350 g peeled ripe bananas (approximately 3 or 4), mashed

125 ml oil

125 ml milk

1 tsp vanilla essence

Method

Preheat oven to 180° Celsius (conventional oven) or 160° Celsius (fan-forced oven). Grease and line 12 cavities in a half-cup (125ml) capacity muffin tray.

Beat eggs in the large bowl of an electric mixer on medium speed for 5 minutes. Sift in the tapioca flour, sorghum flour, brown rice flour, baking powder, cinnamon and psyllium husk. Add brown sugar, bananas, oil, milk and vanilla essence. Mix until well combined.

Spoon mixture into cavities until each cavity is approximately three-quarters full.

Bake for 30 minutes.

Makes 12.

Gluten-free Recipe: Chocolate Apricot Slice

14 Jul

Choc apricot slice 1


If at first you don’t succeed …

And so that’s been the way over the last few months as I’ve been trying to get the base of this recipe right – something close to a lovely short biscuit base but not quite so crumbly.

I was able to roadtest it on my book group last week. There was a unanimous thumbs up so at last it’s ready for you as well.

This recipe is quite low in sugar. The base has added sugar but the middle layer is just puréed apricots, and the chocolate layer is guilt-free with no added fructose. So the kids will think it’s a sweet treat but you’re not overloading them with sugar. Continue reading

It’s a Giveaway!

7 Jul Gluten-free Lunchboxes Cover


Gluten-free Lunchboxes Cover


It’s giveaway time! 

I’m feeling generous, so I’m going to give away my eCookbook to 3 lucky people! It’s filled with great lunchbox recipes, family meal ideas and special occasion treats. All recipes are gluten-free and nut-free and many can be converted to dairy-free as well. It’s also professionally designed and looks absolutely beautiful. I’m so proud of it and would love to share it with you.

To be eligible to win, simply subscribe to my blog by entering your email address in the Subscribe box on the right. Not only will that give you an entry, but you’ll also receive all of my posts by email. That’s right – every new recipe that I post will be delivered straight to your inbox. What’s not to love?

Giveaway closes on Friday 10 July 2015 at 5.00pm, Australian Central Standard time.

Winners will be chosen at random and notified by email.

Winners will be announced in the comments section of this post.

Good luck!

Gluten-free blueberry orange and cinnamon muffins

9 Jun

2015-06-04 14.45.07

I did it! By George, I really did it!

Yup, it’s a good day when you get to quote Henry Higgins from My Fair Lady. Even better because … ta-da! … At last I can bring you this recipe.

You may recall that a few weeks ago I posted a recipe for Cake Balls, which was basically a guide to salvaging a baking disaster. You know, the cake that sank, or was too dry, or charred, or in my case, crumbled into smithereens at the slightest touch. Take the edible bits of the cake, muffin, biscuits or slice, process into crumbs and turn them into cake balls. Continue reading

Rescue from the wreckage: Gluten free Cake Balls

9 May


Gluten-free Cake Balls

Gluten-free Cake Balls

Oh, damn. Damn, damn, DAMN!

Insert multiple expletives here. Oh, $%&*#@$*!!!!!!!

This is why I’m swearing. I had this idea for a GORGEOUS recipe. Orange and blueberry loaf. Sounds divine, doesn’t it? Wholesome and comforting.

Well, it didn’t work as a loaf, so I tweaked the recipe and then made it as muffins. Still didn’t work, so I tweaked again and made them into mini-muffins. Didn’t work once. Didn’t work twice. Didn’t work thrice. … and so on.

And damn it, I’m so convinced that it should work. I just haven’t found the missing link. But these little babies are so fragile that they just about explode in your hand as soon as you pick them up. And let me be clear here – they don’t just fall apart, they shatter into a zillion crumbs. You might be able to tell from the picture above. So I’m not blogging that recipe. Not yet, anyway.

Gluten-free ingredients ain’t the cheapest, folks, especially with a handful of frozen blueberries thrown in, and I just can’t bear wasting food, so what to do?

Well, I decided to salvage something from the train-wreck.

When you have a cake or muffin disaster – when the cake’s too dry, falls apart, burns or crumbles, here’s what to do. Take the (non-burned) bits of cake and process them into crumbs, then add a few ingredients to make cake balls. You’ll get the flavour of the cake, repackaged into something that can go into the lunchbox and can also be frozen. These cake balls were fairly unattractive – the blueberries made them a fairly icky grey colour – so I rolled them in coconut as well. That disguised the colour enough to tempt the kids and my Hubby and everyone gave it the thumbs up.

Because I’ve attempted this recipe a number of times, I’ve got loads of these crumbs in the freezer – I weighed them into 100 gram batches and put them into small snap-lock bags. I can defrost and use them whenever. And here’s another idea – for a quick dessert, make some custard (for a recipe, check out the Bread and Butter Puddings recipe in my eCookbook), gently fry some of the crumbs in butter and then sprinkle over the warm custard. Yum!

And, oh yeah, I know I’m on a bit of a theme with balls at the moment, but y’know. When you’re on a good thing …

Enjoy!

Ingredients

500 g gluten-free cake or muffin crumbs

2 tbs melted coconut oil

100 g desiccated coconut

50 g desiccated coconut, extra, for rolling

Method

In a large bowl, combine crumbs, coconut oil and 100 g desiccated coconut. Mixture should press together firmly without any excess liquid.

Roll dessert-spoonfuls of the mixture into balls. Put 50 g desiccated coconut into a bowl and roll the balls in the coconut.

Refrigerate until ready to serve.

Makes approximately 40 balls.

Gluten-free Anzac Biscuits

24 Apr

Anzac 4

Tomorrow, 25 April 2015, is the Centenary of the ANZAC landing at Gallipoli, Turkey.

It is a hugely important day in Australia’s calendar and will be commemorated nation-wide with dawn services and Anzac Day parades. It is the day on which we stop to pay tribute to all the men and women who have fought for Australia in war.

On 25 April 1915, the ANZACs (Australian and New Zealand Army Corps) landed on Gallipoli peninsula, the mission being to swiftly knock Turkey out of the war. But instead they encountered fierce resistance from the Turks and the battle raged for eight months until the Allies gave the order for the ANZACS to evacuate. More than 8000 Australians lost their lives.

Australia and Turkey now share an enduring friendship and for many years now there has been a dawn service at Gallipoli. This year, to mark the centenary, there will be even more people there – more dignitaries, more media, and especially more Australians and New Zealanders coming to pay their respects. By all accounts that service is incredibly moving, especially when seeing the beach surrounded by enormous cliffs. The ANZACs had no idea what they were getting into – it was a blood bath.

For more information on Anzac Day, click here.

One lovely Anzac Day tradition is Anzac biscuits. The ANZAC’s food was generally nutritionally poor and in short supply. There was so much concern on the home front that efforts were made to send food across to the troops (or “Diggers” as they are affectionately known here in Australia). The problem was, all food packages had to travel at least two months by boat. Ingredients had to be chosen carefully, otherwise the food would perish. Eggs could not be used – not only would they perish quickly, but they were also in short supply on the home front.

Eventually, the combination of oats, flour, treacle (or golden syrup), sugar and bicarbonate of soda was settled upon. The oats were filling and nutritious and all of the ingredients had a long shelf life. Even better, the treacle acted as the binding agent, so eggs were not required. The biscuits could be cooked until hard and crunchy, also ensuring their shelf life.

Anzac biscuits became a staple food for Diggers at war.

For more information on Anzac biscuits, click here.

These days, Anzac biscuits are adored all over Australia. Now that we don’t require them to keep for months on end, we have the luxury of making them soft and chewy or hard and crunchy – it’s a simple matter of adjusting the cooking time. We love them soft and chewy.

Before my daughter was diagnosed with Coeliac Disease, I used to make Anzac biscuits regularly, especially when my kids had friends over. They were a great way for the kids to have some fun baking.

Because oats are not recommended for Coeliacs in Australia, I’ve barely made them since her diagnosis. But a little while ago, I was asked if I’d post a recipe for gluten-free Anzacs and so, along with many other Australian bloggers, here’s a recipe for you to consider.

I have adapted it from my fantastic never-fail recipe in our local child care centre’s cookbook. I’ve used quinoa flakes instead of oats, but if your kids find the taste too strong, try using 50 g quinoa flakes and 50 g roughly crushed gluten-free cornflakes.

I’ve also reduced the sugar in this recipe, to make it more appropriate for lunchboxes.


They shall grow not old as we that are left grow old.

Age shall not weary them, nor the years condemn.

At the going down of the sun and in the morning

We will remember them.

Lest we forget.


Ingredients

100 g quinoa flakes

120 g gluten-free plain flour

100 g white sugar

75 g desiccated coconut

125 g butter

1 tbs golden syrup (or treacle)

1 ½ tsp bicarbonate of soda

Method

Preheat oven to 160° Celsius (conventional oven) or 140° Celsius (fan-forced oven). Grease and line large baking tray or cookie sheet.

In a large bowl, combine quinoa flakes, flour, sugar and desiccated coconut. Make a well in centre.

Put a small saucepan over medium heat and add butter and golden syrup. Stir occasionally until butter is melted. Remove from heat.

Put bicarbonate of soda into a small bowl and add 2 tbs boiling water. Stir quickly to combine. The mixture will start fizzing. While still fizzing, add to the saucepan and stir quickly. The mixture with froth up. Quickly pour mixture into dry ingredients and mix. Add an extra 2 tbs water and mix together until just combined. The mixture should press together but there should not be any excess liquid.

Roll dessert spoonfuls of the mixture into balls and place onto the tray, allowing room for spreading. Gently press each ball down with a fork.

Bake for 12 minutes for soft biscuits, or 20 minutes for crunchy biscuits.

Makes approximately 16.