Archive | October, 2015

Egg-free Meringues. That’s right!

28 Oct

chickpea meringues

No need to adjust your screen. You read that correctly. EGG-FREE MERINGUES!

“How is that possible?” I hear you ask.

Well, it goes a little something like this.

A few months ago, I noticed a bit of hype on the airwaves about the magic of chickpea brine and how it behaved like eggs in baked goods.

You know chickpea brine. It’s the liquid you get in a can of chickpeas. It’s a cheap, everyday product that is readily accessible in supermarkets. You’ve probably got a can of chickpeas in your pantry right now.

This blew my mind so I had to find out more. I clicked onto this article by Food 52, which is one of the most reputable and highly respected foodie sites in the United States. Sure enough, it seemed true and it included tips on what quantities to use as an egg replacer in baking. So if you or your child needs to be egg-free, it’s well worth a read.

After that, my blogging buddy Janet, a Coeliac chef who blogs at So I Burnt Dinner, posted the successful results of her cooking students experimenting with the idea.

Then more recently, I was reading issue 6 of Australian Gluten-free Life Magazine. On page 38 is a recipe for Vegan Rosewater Meringues, which I mentally filed away for future reference. [Update: Cara, editor extraordinaire at Australian Gluten-free Life Magazine, has very kindly given permission for the recipe to be reproduced in this post. See below for the recipe.]

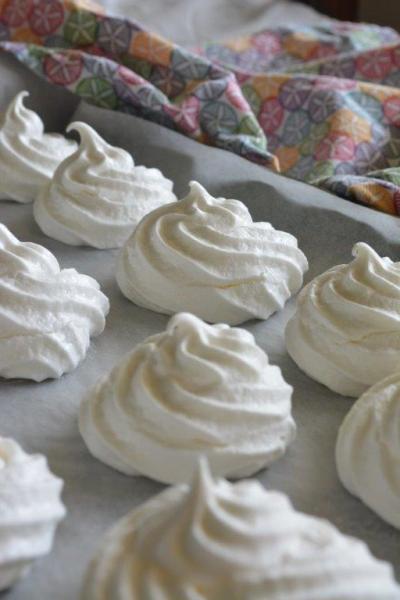
On the weekend, we had guests for lunch. I was opening a few cans of chickpeas. “What the hell,” I thought. I dug out my Australian Gluten-free Life mag and put some brine in the mixer. It took about 15 minutes to whisk it into stiff peaks. Once the sugar and other ingredients were added, it tasted just like meringues. The mixture was stiff enough to pipe onto a tray, as you can see from the photo above.

After they’d been baked, they were white and, even though I’m no meringue connoisseur, tasted just like the real deal. They did go a little soft after they’d cooled, so I just popped them back in the oven and they crisped up like a dream.

A little bit goes a long way – the recipe yielded about 35 meringues, for a fraction of the price of egg meringues.

This is such a revelation that I just cannot resist giving you an allergen check-list:

  • Gluten-free.
  • Egg-free.
  • Nut-free.
  • Dairy-free.
  • Soy-free.

And just for good measure, vegan.

So if you or your little one need to be egg-free, spend a little time to look into chickpea brine as an egg replacer. Trust me, it’s amazing.

Enjoy!

Ingredients

Brine from 400 g can of chickpeas

1 cup white sugar

½ teaspoon cream of tartar

1 teaspoon vanilla essence

1 teaspoon rosewater

Method

Preheat fan-forced oven to 120° Celsius. Line one or two baking sheets (or cookie trays) with baking paper.

Place the brine in a large bowl and beat with an electric mixer until soft peaks form. Gradually add sugar, beating until dissolved after each addition.

Add cream of tartar and continue to beat until soft peaks form. Stir through vanilla essence and rosewater.

Place spoonfuls of the mixture onto a prepared tray. Bake for 30-40 minutes or until crisp.

Makes up to 35.

Gluten-free Recipe: Pine+Apple Cake with Maple Icing

20 Oct

pine+apple cake 2

I can’t think of anything meaningful to say this week, so instead here are three random and unrelated facts about me:

  1. My 5 year-old son and I are making a pompom. That is, I’m making the pom pom while he gets the wool nicely tangled and strewn up everywhere. It’s for a kindy project – all the kindy kids’ pompoms are going to be hung from a tree. It should look amazing. They’re so easy to make, thank God, as my craft skills would barely cope with anything else. Previous parents were asked to knit squares for a blanket. Jeez, that would have been my worst nightmare. My poor Mum tried to teach me to knit but I was just so hopeless at it. She blamed it on my severe left-handedness. I blamed it on lack of talent. To this day, I think she considers it a parental failing that I can’t knit. Time to let that one go, Mum!
  2. Thanks to the recommendation of a good friend, my Husband and I are currently watching Studio 60 on the Sunset Strip, created and written by Aaron Sorkin. Damn, it’s good. I love Sorkin’s work. I really loved The Newsroom and earlier this year I did manage to work my way through one season of The West Wing – still fab after all this time. I don’t think I’ll rest until I’ve watched everything Sorkin has ever done. He’s a genius.
  3. We are in the middle of spring here in Australia and that means that everyone’s having garage sales and all the schools are having fundraising fairs or fetes. That means loads of second-hand goods. That means plenty of opportunities to buy props for food photos, as well as kids’ clothes and toys. I love a bargain, so this makes me happy. I love a bargain so much that I’m thinking about blogging my food prop purchases. What do you think? If you love a bargain as much as me, check out the lovely blog The Second Hand City, especially if you live in Melbourne. It’s wonderful for glimpses of how its author, Leanne, finds and uses her recycled treasures.

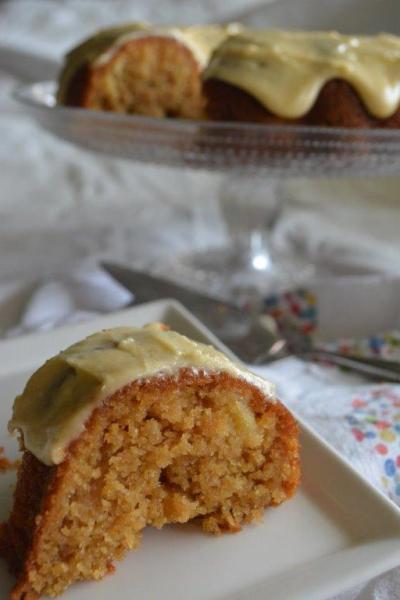
That’s all. But I should just say that this recipe is awesome. And I think its name is awesome, too (pineapple plus apple equals pine+apple. Geddit?). So you can either choose to bask in its awesomeness by cooking it, or not.

Oh, and yes, occasionally I allow my kids to have iced cakes at school. Gotta be healthy most of the time, but gotta live as well. And honestly, you are really going to want to try the maple icing.

Enjoy!

Method

Cake

2 eggs

150 g brown sugar

50 g tapioca flour

70 g sorghum flour

60 g brown rice flour

30 g baking powder

5 g psyllium husks

200 g (approximately 2)  peeled, cored and grated apple

120 g (approximately 3 rings) drained tinned pineapple

125 ml oil

Icing

45 g butter, melted

1 ½ tbs pure maple syrup

100 g gluten-free icing mixture

Method

Preheat oven to 180° Celsius (conventional oven) or 160° Celsius (fan-forced oven). Grease a 24 cm fluted ring cake tin.

Beat eggs in the large bowl of an electric mixer on medium speed for 5 minutes. Add sugar and beat for a further 2 minutes.

Sift in tapioca flour, sorghum flour, brown rice flour, baking powder and psyllium husks. Add apple.

Chop the pineapple into 1 cm chunks and add to the mixture. Add oil.

Mix until well combined.

Pour into tin and make sure mixture is evenly disbursed. Bake for 35-40 minutes or until a skewer, when inserted, comes out clean.

Allow to cool in tin.

When cake is completely cooled, turn out onto a plate.

To make the icing, put the butter in a small bowl and cover with a plate or plastic film. Microwave on high for 30 seconds or until butter is melted.

Sift icing mixture into a medium sized bowl and add maple syrup. Add butter and stir to combine. Spread evenly over cake and stand for a few minutes to set.

Makes 8 to 10 slices.


Gluten-free Recipe: Salmon, Apple and Rosemary Bites

10 Oct

SalmonAppleBites

Yes, I’m out on a limb with this recipe. Putting fish in a lunchbox is a little dicey – there’s always the risk that by lunchtime the fish smell will be overpowering not only your child but everyone else as well. Noone wants their kid to be in fishy exile for all of lunchtime!

Having said that, it’s not the first time I’ve developed a fish recipe for the lunchbox. You may remember my Tuna and Rice Cakes which are basically an evening meal recipe, with the leftovers being  ideal for the next day’s lunch. You can find that recipe in my eCookbook.

You’ll be pleased to know that I’ve roadtested these bites in the school lunchboxes as well as sending them to work with my Husband. Thumbs up!

What’s the trick? Well, salmon is a fairly mild flavoured fish when canned, compared with, say, tuna. And the apple  lends some sweetness. In all, it’s a great way to introduce your little ones to fish.

Personally, I love the way the rosemary compliments the salmon and apple, but if it raises your child’s suspicions, just leave it out.

And for a grown up twist? Try serving the bites as finger food. Leave whole or slice in half, with a dollop of sour cream and some fish roe. Or warm with a decadent dollop of butter. Delish!

The salmon and yoghurt give these bites a good lug of protein, essential for keeping tummies feeling full, so I simply send them in the lunchbox with some vegetable sticks. And an icepack to keep them fresh.

Enjoy!

[su_button url=”http://www.glutenfreelunchboxes.com/shop/” target=”blank” style=”flat” background=”#e659ae” color=”#ffffff” size=”7″ wide=”yes” center=”yes” radius=”round”]Gluten-free Lunchboxes eCookbook – Shop Now[/su_button]

Ingredients

2 eggs

65 g tapioca flour

80 g brown rice flour

85 g sorghum flour

5 g psyllium husk

20 g baking powder

210 tin pink salmon

170 g peeled, cored and grated apple (approximately 2 large apples)

2 tsp chopped fresh rosemary leaves

140 g Greek yoghurt

125 ml oil

Salt

Method

Preheat oven to 180° Celsius (convential oven) or 160° Celsius (fan-forced oven). Grease 24 cavities in a 30 ml capacity mini muffin tray.

Beat eggs in large bowl of an electric mixer for 5 minutes.

Sift into the bowl tapioca flour, sorghum flour, brown rice flour, psyllium husk and baking powder.

Drain the salmon and remove and discard bones and as much skin as possible. Add salmon to bowl, along with apple and 1 tsp of rosemary leaves.

Add yoghurt, oil and generous pinch of salt and mix until combined.

Spoon mixture into cavities until each cavity is approximately three-quarters full. Top each bite with a little rosemary and salt.

Bake for 25 minutes or until a skewer, after inserted, comes out clean.

Alow to cool in tin.

Makes approximately 24.